ADJUSTABLE CORDURA WEIGHT BELTS COMPACT CAPACITY
![]() These 4 or 6 pocket weight belts can hold 6 lbs. (or
more) of hard lead or, 10 lbs. of shot
per pocket. This produces a ballast up
to - 24 & 36 lbs.- or - 40 & 60 lbs.- respectively. We have reduced the conventional pocket models length by over
12" while at the same time increasing the payload.
These 4 or 6 pocket weight belts can hold 6 lbs. (or
more) of hard lead or, 10 lbs. of shot
per pocket. This produces a ballast up
to - 24 & 36 lbs.- or - 40 & 60 lbs.- respectively. We have reduced the conventional pocket models length by over
12" while at the same time increasing the payload.
The new slim 3-d pocket
permits us to place a lot of lead in a short distance.
Adjustable waistline
The adjustability permits the individual to shift the
carrying pockets forward & backward
to accommodate a variety of divers dress and body shapes. The rear of the belt is usually left open to
permit the comfortable carrying of an air cylinder. The open space keeps lead out from under the tank, preventing
lower spine pressure.
Maintains balance. The diver can at will, shift their center of
gravity (weight forward or backward) to maintain a comfortable swimming
position and to compensate for any unusual BCs or equipment characteristics. This reduces stress and fatigue.
Commercial or custom belt and pocket can be accommodated
for a small surcharge. Pouches for lead
shot available upon request.
Aesthetically pleasing, available in
a variety of colors, and packs up neatly in the dive bag.
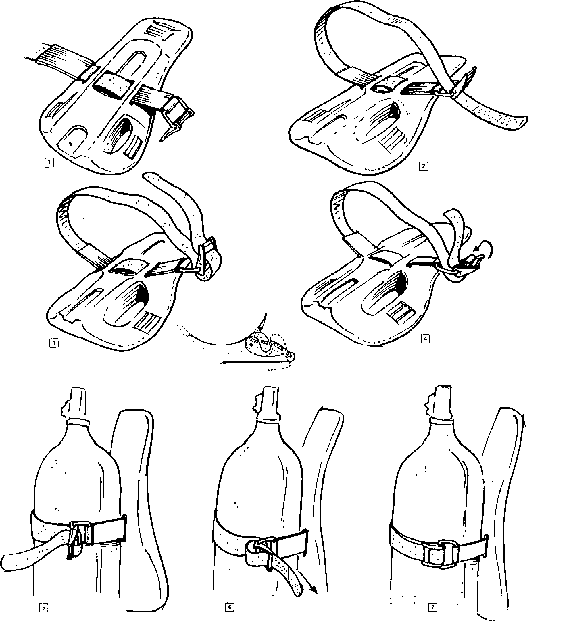
Instructions for the Cam Band Assembly
WARNING; Proper
installation and adjustment are EXTREMELY IMPORTANT to assure correct
performance of backpack. Improper
installation on cylinder may allow cylinder to slip out of backpack. Loss of cylinder could result in loss of
buoyancy control, and/or air supply and personal injury could result. If you have any questions about the proper
use of this product ask your driving instructor. 3eaier. or distributor.
To allow for
natural stretch of nylon as it absorbs water, it is EXTREMELY IMPORTANT to soak
the tank band in water prior to ~l+qy_USE.
Failure to soak the tank band may permit the band to stretch and loosen
during use, and may allow tank to slip out of band.
I
Insert cam-over strap through backpack as shown. Make certain rubber
sleeves remain outside of backpack plate, one on either =
side (Make certain that this rubber sleeve
next to the cam buckle is as close to backpack plate as possible)
2 Insert the 2" Adjustment NelcroQ strap
through the wire-formed opening as shown (Follow solid lines in diagram 3)
3 Continue
threading strap through the center slot located at the thicker end of plastic
cam buckle.
4 Next, thread
strap through the lower slot located st the thicker end of plastic cam buckle.
5 Mount backpack
on cylinder and adjust to desired diameter and tension. l~
6 Thread strap
through remaining slot on cam buckle.
~ Finally, “snap’
over entire cam and secure to Velcro Make certain cylinder is firmly secured.
8 TO OPEN: Detach
Velcro) and “unsnap” the cam. ll. is not necessary to unthread this strap to
detach from the cylinder. The first (6)
~
steps need not be repeated as long as you are
using the same diameter cylinder.
9 To maintain a
permanent position of the strap assembly. you may thread the adjustment Velcro
strap in the following manner
(follow
dotted line in diagram 3).